Termite pre-treatment is an essential process that safeguards new buildings from the threat of termite infestations. By implementing this process during the construction phase, property owners can significantly reduce the risk of structural damage caused by termites over time. Below is a detailed step-by-step guide to ensure an effective termite pre-treatment process.
Step 1: Conduct a Site Inspection
Before initiating termite treatment, it is crucial to carry out a thorough inspection of the construction site. This step helps identify factors that may increase the vulnerability of the structure to termites, such as:
– Presence of existing wood debris or organic matter in the soil
– High moisture levels in or around the site
– Proximity to termite-prone areas such as wooded regions or water sources
A professional pest control service such as https://miamitermitesolutions.com/ can assist in assessing these conditions and devising an appropriate treatment plan.
Step 2: Soil Treatment Application
Soil treatment forms the foundation of termite pre-treatment processes and involves applying termiticides directly to the soil beneath and around the building’s foundation. The steps involved are:
1. Clearing Debris: Ensure that all vegetation and wood debris are removed from the construction area.
2. Excavation Preparation: Treat soil prior to pouring concrete slabs by excavating trenches along walls, columns, and foundation points.
3. Applying Termiticide: Spray liquid termiticide evenly across exposed soil in layers, ensuring comprehensive coverage beneath foundations and around utility points (e.g., plumbing lines).
| Area | Recommended Termiticide Application Rate |
| Foundation Soil | 4 liters per square meter |
| Trenches (vertical) | 5 liters per linear meter |
| Pipe Penetration Zones | Sufficient saturation for barrier creation |
Step 3: Sealing Points of Vulnerability
After treating soil, focus on sealing off potential entry points that termites might exploit later during or after construction:
– Treat pipe and conduit penetrations with termiticide foam or specialized sealants.
– Use physical barriers like stainless steel mesh or sand barriers at vulnerable junctions within the building’s design.
Step 4: Monitoring During Construction
Throughout construction, ongoing supervision ensures that treated areas remain undisturbed by excavation or other activities that could compromise their effectiveness. It’s vital to reapply treatments if necessary when portions of treated soil are moved or disturbed.
Step 5: Post-Treatment Certification & Documentation
Once treatment is complete, request documentation from your pest control provider detailing:
– The type(s) of termiticides used (chemical name and concentration)
– Treatment application methods and coverage areas
– Warranty terms covering future termite incidents
This certification not only serves as proof for future reference but also provides assurance about compliance with local building codes.
By integrating this systematic approach into your construction projects, you minimize long-term risks while protecting your investment against costly repairs stemming from termite infestations.
Effective Miami Termite Control: Understanding Behavior and Risks to Structures
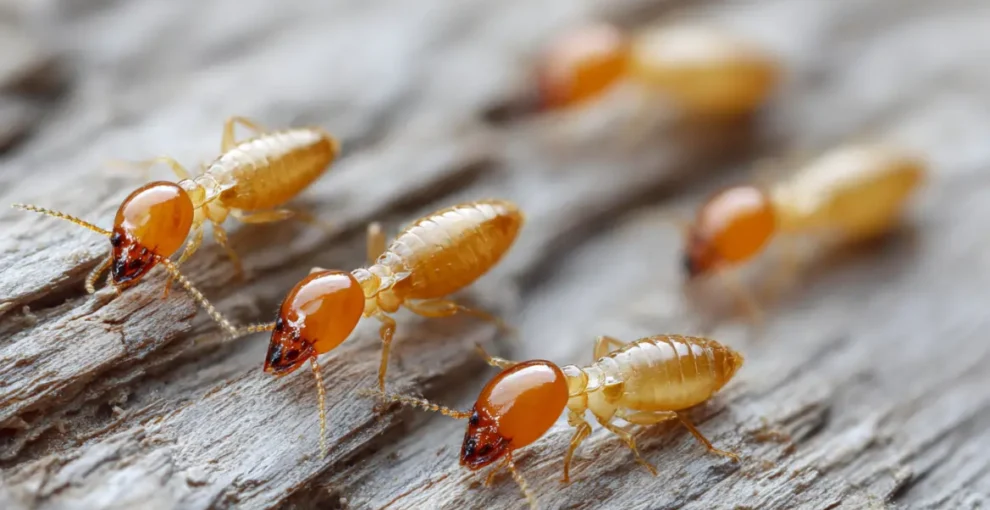
Termites are among the most destructive pests in the world, causing significant damage to buildings and structures. To effectively manage or prevent infestations, it is essential to understand their behavior, lifecycle, and the risks they pose. Below is a detailed overview of termite behavior and why they are a threat to structural integrity.
- Social Structure:
Termites are social insects that live in colonies. Each colony consists of distinct castes – workers, soldiers, and reproductives (queens and kings), each with specific roles: - Workers: Responsible for foraging, feeding other members of the colony, and maintaining tunnels.
- Soldiers: Protect the colony from predators such as ants.
- Reproductives: The queen lays eggs to expand the colony.
- Nutritional Needs:
Termites primarily feed on cellulose, a major component of wood. Their ability to break down cellulose using symbiotic microorganisms in their digestive system allows them to consume wood-based materials like furniture, flooring, walls, structural beams, and more. - Moisture Dependence:
Subterranean termites require moisture to survive. This is why they typically build mud tubes for protection while traveling between their nest and food sources. Drywood termites have lower moisture requirements but still prefer humid environments. - Colony Growth:
A mature termite colony may contain tens of thousands to millions of individuals. Some colonies can persist for years without detection if proper inspections are not conducted.
Effective Solutions from a Termite Exterminator Miami to Protect Structures
Structural Damage
- Load-Bearing Elements:
Termites often target critical components like wooden beams, columns, or frames that bear structural loads. Over time, this weakens the structure’s ability to support weight. - Foundational Issues:
Subterranean termites usually attack structures from below ground level by accessing wooden foundations or slabs through cracks or expansion joints. - Hidden Damage:
Because termite activity occurs within walls or beneath surfaces, damage often remains unnoticed until it becomes severe.
Financial Impact
Repairing termite damage can be expensive due to: – Replacement costs for damaged wood and materials. – Additional pest control treatments required after an infestation. – Possible structural modifications needed for repair.
| Type of Expense | Estimated Cost Range (USD) | Notes |
| Inspection | $75–$250 | Cost varies based on property size |
| Treatment | $500–$3,000+ | Depends on infestation severity |
| Repairs | $3,000–$8,000+ | Can increase significantly over time |
Health Hazards
While termites do not directly transmit diseases harmful to humans or pets: – Mold may develop in moist areas affected by termites’ tunneling activities. – Dust from damaged wood may trigger allergies or respiratory issues in sensitive individuals.
Effective Termite Removal Miami: Key Signs of an Infestation
To mitigate these risks early on: – Look for mud tubes along walls or foundations. – Inspect wooden elements for hollow sounds when tapped. – Watch out for discarded wings near windowsills—signs of swarming reproductive termites. – Check for bubbling paint or uneven flooring caused by hidden damage.
By understanding how termites behave and recognizing early warning signs of infestation risk factors can be mitigated more effectively before substantial harm occurs.
Effective Miami Termite Treatment Strategies for Long-Lasting Building Protection
Termites are among the most destructive pests, capable of compromising the structural integrity of buildings over time. Implementing pre-construction termite prevention measures is a critical step in safeguarding the longevity of any building. Proactive approaches not only help prevent costly repairs but also enhance the overall safety and durability of structures.
Why Pre-Construction Termite Prevention Matters
- Termites primarily feed on cellulose, which is found in wood and other construction materials like cardboard and paper-based insulation.
- Damaged wooden frameworks, beams, and flooring can severely weaken a building’s structure.
- Repairing termite damage often involves significant expenses that could have been avoided through preventive measures taken during construction.
- Preventative treatments during the building phase are generally more affordable than addressing infestations later on.
- Buildings with robust termite prevention systems tend to retain their market value better than those susceptible to infestations or damage.
Common Pre-Construction Termite Prevention Practices
Soil Treatment for Barrier Creation
Treating the soil underneath and around a foundation with termiticides creates a chemical barrier that deters termites from accessing buildings.
| Step | Process | Purpose |
| 1 | Site inspection | Identify potential risk zones for termites |
| 2 | Application of liquid termiticides | Establish chemical barriers in soil layers |
| 3 | Reapplication (if required) | Reinforce treatment before concrete pouring |
Physical Barriers
- Stainless Steel Mesh: Installed under foundations or around pipes to block termite access.
- Granite Aggregate Layers: Dense materials placed below foundations make tunneling difficult for termites.
Construction Practices
Good design choices can minimize termite risks, such as: – Elevating wooden components off the ground. – Using treated timber resistant to termites. – Designing proper drainage systems to reduce moisture levels, which attract termites.
Benefits of Pre-Treatment Over Post-Treatment
- Ensures comprehensive protection from day one.
- Reduces disruption since treatments are applied before occupancy.
- Eliminates delays or logistical issues associated with infested structures during repairs or treatment.
Key Takeaways
Emphasizing pre-construction termite prevention not only reduces long-term costs but also ensures safer and more durable structures over time. By combining chemical treatments with physical barriers and adopting smart construction practices, builders can effectively combat the risks posed by termites while enhancing property value and safety standards considerably.
Choosing the Right Methods for Effective Termite Treatment Solutions
When it comes to termite treatment, selecting the right method is crucial for protecting structures and ensuring long-term effectiveness. Each method varies in terms of application, efficacy, and suitability depending on the type of construction, soil conditions, and termite infestation level. Below is a detailed discussion of some commonly used methods for termite treatment.
Chemical Treatments
- Liquid Termiticides: Applied to soil around a building’s foundation to form a protective barrier.
- Termite Baits: Placed strategically around the property to attract and kill termites over time.
- Wood Treatments: Application of borates or other preservatives directly on wood to prevent termite damage.
| Chemical Type | Primary Use Case | Advantages | Limitations |
| Liquid Termiticides | Soil treatment | Long-lasting protection | May require trenching or drilling |
| Baits | Colony elimination | Targets termites specifically | Slower results |
| Wood Preservatives | Direct wood protection | Prevents infestations in treated wood | Limited to treated areas |
Physical Barriers
- Stainless Steel Mesh: Installed under foundations or around pipes.
- Granular Barriers (e.g., sand or crushed rock): Creates an environment that termites find difficult to navigate.
- Termite Shields (Metal Flashings): Placed between masonry and wood components.
These solutions are sustainable and work well when integrated into new construction projects.
Biological Control Methods
- Beneficial nematodes that parasitize termites.
- Fungi that infect and kill termites when introduced into their colonies.
While these methods are eco-friendly, they may not be as widely applicable as chemical treatments due to variability in effectiveness.
Integrated Pest Management (IPM)
- Conducting regular inspections for signs of termite activity.
- Using a combination of physical barriers and chemical applications during construction.
- Consistent maintenance practices like sealing cracks, minimizing moisture buildup, and removing debris near foundations.
IPM ensures sustainable protection while minimizing reliance on chemicals alone.
By understanding these treatment options and consulting with professionals when necessary, property owners can select methods best suited for their specific needs, ensuring effective prevention against costly termite damage over time.
Comprehensive Step-by-Step Guide to Soil Treatment for Termite Control
Soil treatment is a cornerstone method in termite prevention, particularly for new construction projects. By creating a chemically treated barrier in the soil surrounding a structure, termites are deterred from breaching and damaging the foundation. The following step-by-step guide outlines the process for effective soil treatment aimed at termite control.
Step 1: Site Preparation
- Clear the construction site of any vegetation, wood debris, or other organic materials that could attract termites.
- Ensure proper grading of the soil to promote drainage away from the foundation. Poor drainage creates conditions favorable to termite activity.
Step 2: Selection of Termiticide
- Fipronil: A non-repellent termiticide effective at low concentrations.
- Chlorantraniliprole: A newer option with lower toxicity to non-target organisms.
- Imidacloprid: A widely used termiticide with long residual activity.
| Termiticide | Key Features | Application Type |
| Fipronil | Non-repellent, long-lasting | Liquid barrier |
| Imidacloprid | High residual effect, systemic | Liquid or granular |
| Bifenthrin | Repellent, budget-friendly option | Liquid barrier |
Step 3: Soil Treatment Before Plumbing Installation
- Apply liquid termiticide directly to trenches dug around the foundation area.
- Follow manufacturer guidelines on mixing ratios and coverage area (e.g., gallons per linear foot).
- Pay extra attention to areas where plumbing will penetrate the foundation. These are common entry points for termites.
Step 4: Treatment During Foundation Pouring
- Treat soil underneath slabs before pouring concrete. This ensures there is no untreated gap beneath the foundation where termites could enter.
- Use specialized equipment such as spray rigs or injection rods to apply the chemical uniformly across large areas.
Step 5: Post-Treatment Applications
After completing construction: 1. Inspect treated zones regularly for breaches caused by landscaping or weather-related disturbances. 2. Reapply termiticides to high-risk areas every three to five years based on product recommendations and environmental conditions.
Best Practices for Soil Treatment
To maximize effectiveness: – Avoid disturbing treated soil layers during landscaping or construction activities. – Maintain at least a six-inch clearance between wooden components of the structure and untreated soil. – Consider using physical barriers like stainless steel mesh or sand along with chemical treatments for added protection.
By adhering to these steps, builders can ensure comprehensive soil treatment that reduces termite risks significantly while extending the lifespan of structures.
Exploring Physical Barriers and Construction Practices to Avoid Termite Infestations
Preventing termite infestations begins with implementing effective physical barriers and adhering to construction practices that deter these pests. Termites are highly destructive, but incorporating the right measures during construction can significantly mitigate risks. This article explores key strategies to protect structures from termite damage.
Common Physical Barriers for Termite Prevention
- Fine-grade stainless steel mesh is installed around the foundation, pipe penetrations, and other entry points.
- The small mesh size prevents termites from gaining access while allowing air circulation.
- Designed using specific sizes of crushed rock that termites cannot easily move or tunnel through.
- Often placed around building perimeters or under slabs.
- Pouring a continuous, well-compacted concrete slab reduces potential entry points under a structure.
- Properly sealed expansion joints further enhance protection.
- High-density polyethylene sheets treated with a termiticide can be installed beneath foundations or in crawl spaces.
- These sheets block access while repelling termites chemically.
Construction Practices That Deter Termites
- Site Preparation: Clear all vegetation, tree stumps, and wood debris from the site before beginning construction since these materials attract termites.
- Use Treated Wood: Pressure-treated timber or wood infused with termiticides should be used for structural components close to the ground.
- Maintain Proper Clearance: Ensure adequate space between soil and wooden elements such as floor joists or siding.
- Drainage Management: Prevent excess moisture by designing proper drainage systems around the building’s foundation.
- Seal Entry Points: Gaps around plumbing, electrical conduits, and expansion joints should be sealed with high-quality caulking materials.
A Comparison of Physical Barriers vs Construction Practices
| Aspect | Physical Barriers | Construction Practices |
| Primary Function | Blocks termite entry directly | Modifies environment to discourage termites |
| Examples | Stainless steel mesh, stone particles | Treated wood, moisture control |
| Chemical Use | Minimal (if any) | Low to moderate |
| Maintenance Requirements | Typically low | May require periodic inspections |
Combining Approaches for Maximum Effectiveness
To maximize protection against termites, combining physical barriers with sound construction practices is recommended. For example: – Use stainless steel mesh alongside well-compacted concrete slabs for the foundation. – Incorporate termite-resistant building materials while ensuring proper drainage systems are in place.
By integrating multiple methods during the design and build process, property owners can establish a comprehensive defense system against termite infestations that ensures their structure’s longevity and safety over time.
Benefits of Hiring Professional Pest Control Services for Termite Management
Termites can cause extensive damage to buildings and structures if not managed effectively. While DIY methods may seem appealing, hiring professional pest control services offers several advantages. Professionals bring expertise, equipment, and tailored solutions that ensure long-term protection against termite infestations. Below are some key benefits of opting for professional services.
Expertise and Knowledge
- Accurate Identification: Professionals are trained to identify termite species and assess the level of infestation, which helps in selecting the most effective treatment option.
- Understanding Termite Behavior: Pest control experts know how termites operate, from their nesting habits to their feeding patterns, allowing them to target colonies effectively.
- Customized Solutions: Every property is different. Professionals can provide specific treatment plans tailored to your building’s needs.
Advanced Tools and Techniques
Professional pest control services use state-of-the-art tools and technologies that go beyond what is available in over-the-counter products: – Infrared Cameras: Used to detect termites inside walls or under flooring without invasive inspections. – Baiting Systems: Installed strategically to lure termites away from the structure. – Chemical Treatments: Application of termiticides or other soil treatments with precision tools ensures thorough coverage.
Prevention-Oriented Approach
Hiring professionals focuses not only on eliminating an existing infestation but also on long-term prevention: 1. They inspect your property regularly to detect early signs of activity. 2. Implement preventive measures like physical barriers and treated zones around foundations. 3. Provide education on maintenance practices that reduce risks.
Cost-Effectiveness
Although professional services may seem expensive initially, they often save money in the long term: | Expense Type | DIY Approach | Professional Services | |—————————|——————————|———————————–| | Short-Term Costs | Low | Moderate | | Long-Term Costs (Repairs) | High (due to re-infestation) | Low | | Effectiveness | Inconsistent | High |
Professionals prevent costly structural repairs by addressing the root cause effectively.
Safety Assurance
Improper use of chemicals can pose risks to human health as well as pets. Experts use regulated products safely in accordance with industry standards: – Eco-friendly options are available for minimizing environmental impact. – Protective measures ensure indoor air quality isn’t compromised during treatments.
Warranties and Follow-Ups
Many pest control companies offer warranties on their services: – If termites return within a specified period, additional treatments are often provided at no extra cost. – Follow-up inspections ensure ongoing protection.
Time-Saving Solution
Managing a termite infestation requires significant time and effort when done independently. Professionals streamline this process by handling everything from inspection to treatment efficiently: 1. Quickly assess the situation using advanced equipment. 2. Complete necessary procedures with minimal disruption to your daily activities.
By relying on skilled technicians, homeowners and builders can focus on other priorities while ensuring their structure remains protected from termites in the long term.
Evaluating the Costs and ROI of Preventative Measures Against Termites
Termite infestations can result in significant structural damage to buildings, leading to costly repairs and diminished property value. Implementing preventative measures against termites is a proactive approach, but many property owners may question whether the investment is worth it. This section evaluates the costs of termite prevention strategies relative to their return on investment (ROI), helping stakeholders make informed decisions.
Costs of Preventative Measures
- Soil treatment: $3–$7 per square foot
- Barrier systems (e.g., physical barriers): $500–$2,000 depending on size
- Chemical termiticides: $1,000–$3,000 for full coverage
- Baiting systems: $20–$50 per bait station (plus monitoring fees)
- Periodic inspections: $75–$200 per visit
- Ongoing maintenance: Annual contracts for professional pest control can cost between $300 and $600.
Factors Influencing ROI
- Long-term Savings
Investing in preventative measures reduces the likelihood of infestations that could result in repair bills ranging from $3,000 to over $10,000 for major structural damage. - Property Value Retention
Termite damage can lower the resale value of a property or deter potential buyers entirely. Prevention ensures that properties maintain their marketability. - Reduced Risk of Secondary Problems
Untreated infestations often lead to secondary issues such as mold or water damage due to compromised wood structures. Prevention mitigates these risks. - Peace of Mind
While intangible, knowing that a structure is safeguarded against termites adds value for homeowners and investors alike.
Cost-Benefit Table
| Type of Measure | Estimated Cost | Potential Savings |
| Pre-construction soil treatment | $3–$7 per sq ft | Avoids structural repairs ($10K+) |
| Physical barriers | $500–$2,000 | Extends building lifespan |
| Annual inspections | $75–$200 per visit | Early detection; prevents infestations |
| Baiting systems | $20–$50 per station | Protects vulnerable areas long-term |
Professional Services vs DIY Methods
- Expertise in identifying vulnerable areas
- Access to advanced tools and products
- Warranties ensuring retreatment if termites are detected within a specified period
Though professional services come at a higher initial cost, they typically yield better ROI through comprehensive protection and reduced likelihood of future infestations.
Final Thoughts on Costs vs Benefits
Preventative termite measures represent an upfront investment aimed at mitigating significant financial losses down the line. By understanding the potential costs versus benefits—both monetary and non-monetary—decision-makers can confidently allocate resources toward safeguarding their structures for years to come.
- Comprehensive Guide to Choosing a Termite Control Company in Miami
- Comprehensive Guide to Miami Termite Control and Understanding These Silent Destroyers
- Effective Miami Termite Treatment: Understanding Their Behavior and Characteristics
- Understanding Miami Termite Control: Key Characteristics and Behaviors of Termites
- How a Termite Control Company in Miami Can Address Changing Infestation Patterns Due to Climate Change
- Miami Termite Treatment: The Ultimate Guide to Understanding and Dealing with Termites